How to implement interface permissions in your workflow
Airtable
15 min read

How to implement interface permissions in your workflow
Working inside of apps in Airtable is a team sport. Many different people from your team, your department, or even your entire company contribute to successful workflows in Airtable, so it's important that each person has access to all the information they need…but also not more information than they need.
You might currently be solving this data access issue by creating personal views within your base, or by creating and managing shared view links for each person on your team. For more complex workflows, you might even have evolved an ecosystem of bases designed to partition off data for specific groups of collaborators. The reality is that while these approaches can work for a time, they inevitably lead to problems—your teammates are juggling too many views, or you're stuck building new bases for every request.
There’s a more efficient and secure solution. Using Interface Designer and granular permissions, you can create tailored and intuitive front-door experiences to your apps without losing centralized flexibility and control. Ultimately this lets you decide what level of access any one person or group has—from read-only to edit-everything.
In this guide, you’ll get a step-by-step walkthrough to help you identify which workflows you should transition from bases and views to interfaces with permissions. You'll also find tips to help you monitor adoption and usage once a transition is complete.
Demo: Streamline collaboration with Interface Designer
Moving from personal views to an interface with permissions
Step 1: Choose the right workflow
The first step is to identify the views you’ll transition. These are often found in bases that have been hit with, as we like to call it, “view sprawl.” Use these questions to assess the workflow(s) supported by these views:
- Do any of the tables in your bases have five or more views supporting a single person or team?
- Do these views exist just to create a filtered version of a different view?
- Is the end goal of these views to make sure individuals or teams aren’t having to constantly re-filter a collaborative view, just to see the records that matter to them?
If you answered yes to any of these questions, you may very well have a base suffering from “view sprawl.” These are often great candidates to become interfaces, customized and personalized using granular permissions.
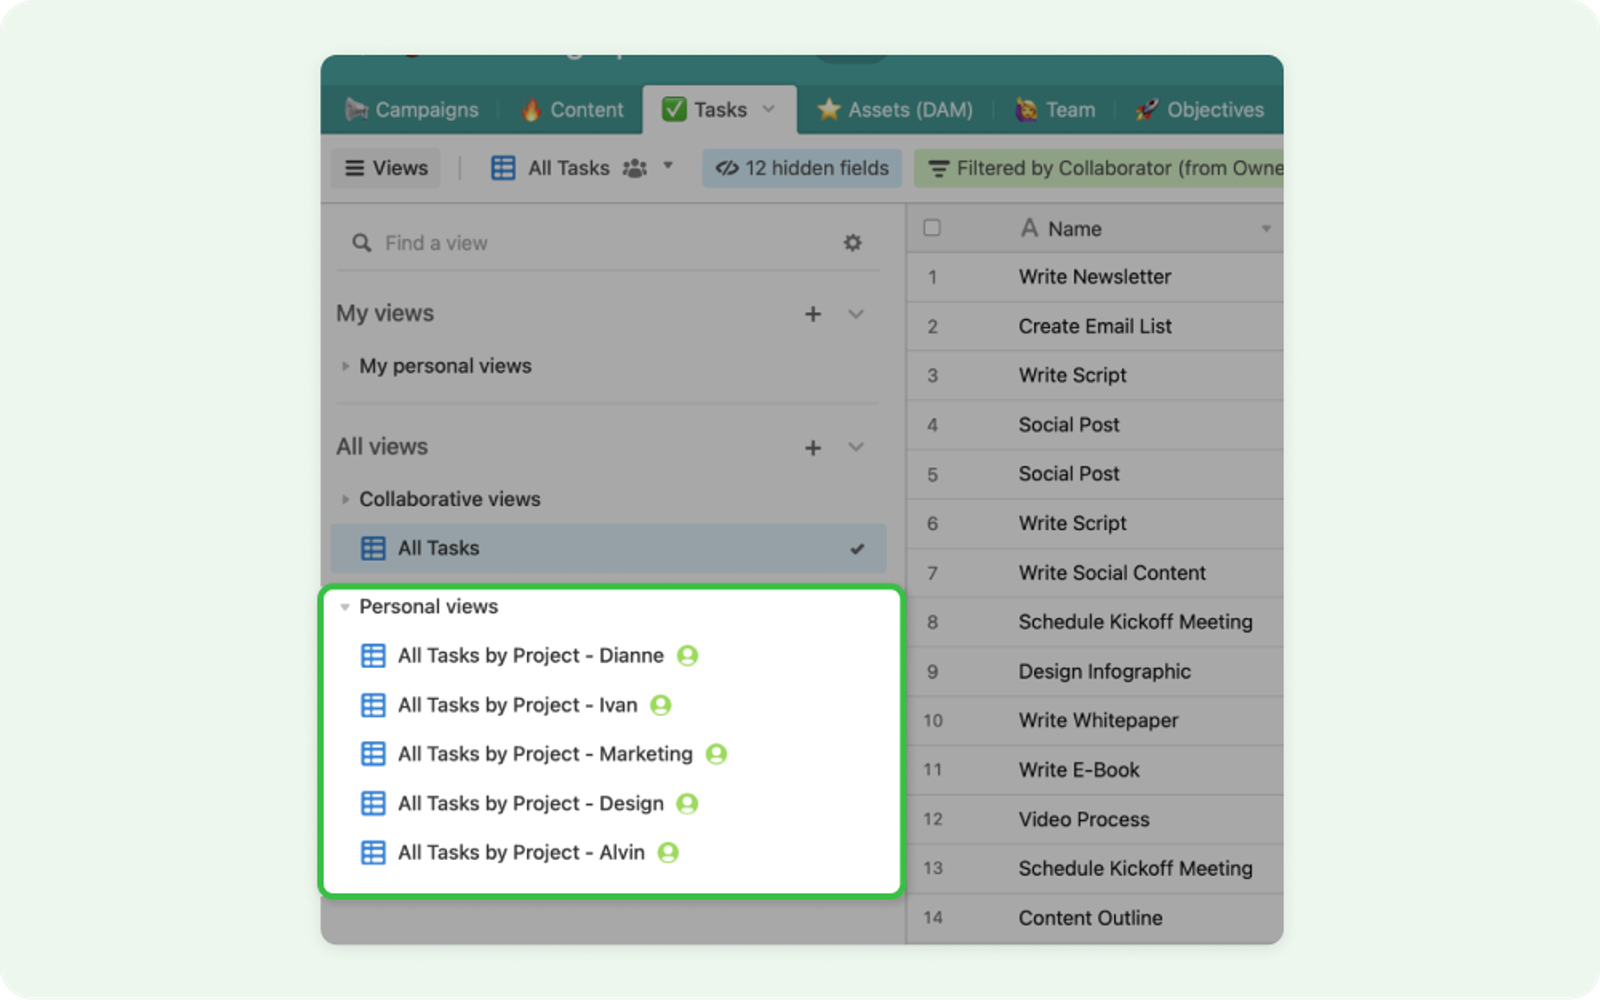
In the example shown above, the marketing team uses a marketing operations base to track campaigns, including associated content and tasks. The Tasks table has multiple personal views that are just duplicates of the “All Tasks” view, but filtered to individuals and teams so they can see the specific records with their assigned work. This is a sign that a single interface (with the right permissions and user filtering applied) might not only provide the same experience for these collaborators, but also be more secure and scalable for the long term.
Pro tip for Business plan and Enterprise Scale customers
If you are on the Airtable Business or Enterprise Scale plan, you have access to additional tools that can help you quickly spot tables with multiple views, as well as view share links that have been generated.
- Using the insights panel can help you quickly see all the views in your base without individually clicking into each table. The insights panel can also tell you how recently a view has been used and by whom, so you can decide whether it’s active or stale.
- If you have admin panel access you can export a list of all generated share links and use it to identify where views might be more broadly shared.
Step 2: Replicate personal views with Interface Designer
After you’ve identified the base with personal views you want to transition to an interface, it’s time to consider the experience you’d like to build using Interface Designer. Think carefully about how your collaborators are using the views you’ve identified, using questions like:
- Are they providing status updates on deliverables and need to be able to edit information?
- Are they leaving comments on records?
- Are they creating entirely new tasks and assigning owners?
All of these considerations will help you decide the type of interface you choose to build and what level of interactivity you allow for.
Once you’re confident you’ve identified the needs of your collaborators, move into Interface Designer and begin building out the customized experience you think best meets those needs. If you are new to Interface Designer, this beginner’s guide has everything you need to get up and running quickly.
Using the marketing operations example above, let’s say that your collaborators just need a way to see their own tasks without the risk of “breaking” other people’s views. They don’t necessarily need access to the full base, just a way to review the work assigned to them, and maybe update a status field. Replicating what they need in Interface Designer is as easy as:
- Starting with the pre-built record review layout
- Updating the source to be the Tasks table
- Adding a filter element tied a user field, and setting it to “current user”
This approach creates a page of tasks that dynamically filters based on who is viewing it. You can even make certain elements themselves editable (instead of view-only), letting collaborators update status fields, due dates, etc. without impacting others. This kind of user filtering is a powerful way to combat “view sprawl” by centralizing a workflow in your app with interfaces.
Step 3: Control exactly what a collaborator sees with user filtering
As you transition a workflow and its views to use interfaces, you may discover that filtering what collaborators see isn’t just a convenience, but actually a data security requirement. If you need to ensure your interfaces can be used by multiple people, but that each person can only see specific records, you'll want to configure user filtering with the interface editor in the sidebar. Using the editor lets you select the “Viewer’s records only” option that filters what is shown to just a viewer’s assigned records. This is similar to using the filter element and setting it to “current user,” as outlined in step 2, except viewers cannot change this configuration.
In fact, only the author of the interface (in this case, you) and other collaborators with “base owner” or “creator” permissions can access this setting. This makes it an excellent way to enforce data security without resorting to manual tactics like creating read-only view share links.
Let’s go back to our earlier marketing operations example. Combining user filtering with any of the record layouts (review or summary) would be an ideal way to consolidate base views and lock down who can see what. Instead of adding a filter element to the page (which would let collaborators self-select what they want to see), we can use the interface editor to configure the record list element to “Viewer’s records only.” This will dynamically filter what’s shown to the person visiting the interface page at the time, surfacing only that person’s individual tasks. This results in both a more secure and more manageable outcome.
Pro tip for Business plan and Enterprise Scale customers
The Airtable Business and Enterprise Scale plan include the user groups feature, which lets you create and manage groups of users for more centralized user security. These groups can be used when configuring user filtering inside of interfaces, allowing you to dynamically show records assigned not just to an individual, but potentially to the individual's team or department.
Step 4: Select the correct interface permission level for your collaborators
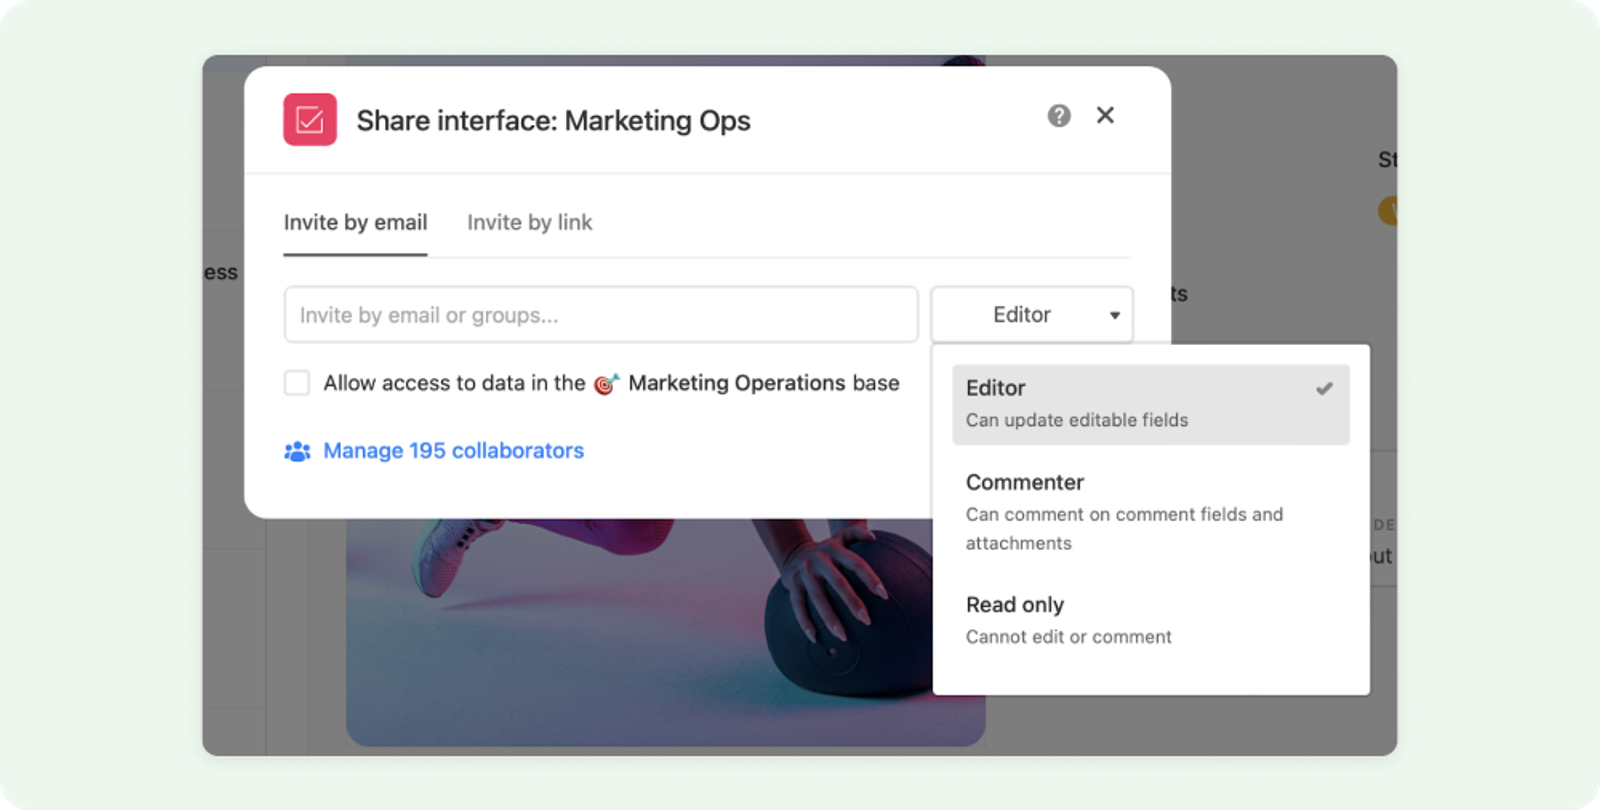
Once you’ve built an interface that supports your collaborators’ workflows, it’s time to determine the level of access they’ll need so you can assign the right permissions. If you are on Airtable’s Team, Business, or Enterprise Scale plan you have the ability to grant collaborators restricted access to individual interfaces using three levels of permissions:
- Interface-only editor: Ability to update records on elements specifically configured to be editable
- Interface-only commenter: Ability to add, edit or remove comments on elements such as Field, Hero, Carousel when an configured to be editable
- Interface-only viewer: Read-only capabilities even if an element is editable
To decide what level of access your collaborators need, ask yourself the four following questions:
- Do the people I’m sharing this interface with need the ability to update fields I’ve configured to be editable like project status or due date?
- Do the people I’m sharing this interface with need the ability to leave comments in records or on things like attachments?
- Do the people I am sharing this interface with only need to view the data, but not take any editable actions?
- Do the people I’m sharing this interface with also need access to the underlying base to be able to configure things at the data and logic layer of my app?
The ability to update fields you’ve configured to be editable
For question number one, if your collaborators need the ability to update fields, then you’ll want to make sure these individuals are given “Editor” permissions when you give them access to the interface. This will guarantee that they can continue to modify the necessary fields in the workflow, assuming you’ve configured those same fields to be editable in your interface.
The ability to leave comments in records or attachments
If your collaborators need the ability to add comments, you’ll want to be sure these collaborators are given “Commenter” permissions when you share your interface. This ensures that these collaborators won’t be able to actually update fields, but will be able to continue leaving comments where you’ve added the record comments element or attachment field to your interface.
The ability to view the data without taking any editable actions
If your collaborators simply need the ability to see the data surfaced in an interface with no requirements for making edits or leaving comments, you’ll want to make sure these individuals are given “Read only” permissions. This ensures that these collaborators have complete visibility to the interface you want to share, but cannot update fields or even leave comments.
The ability to still access the underlying base
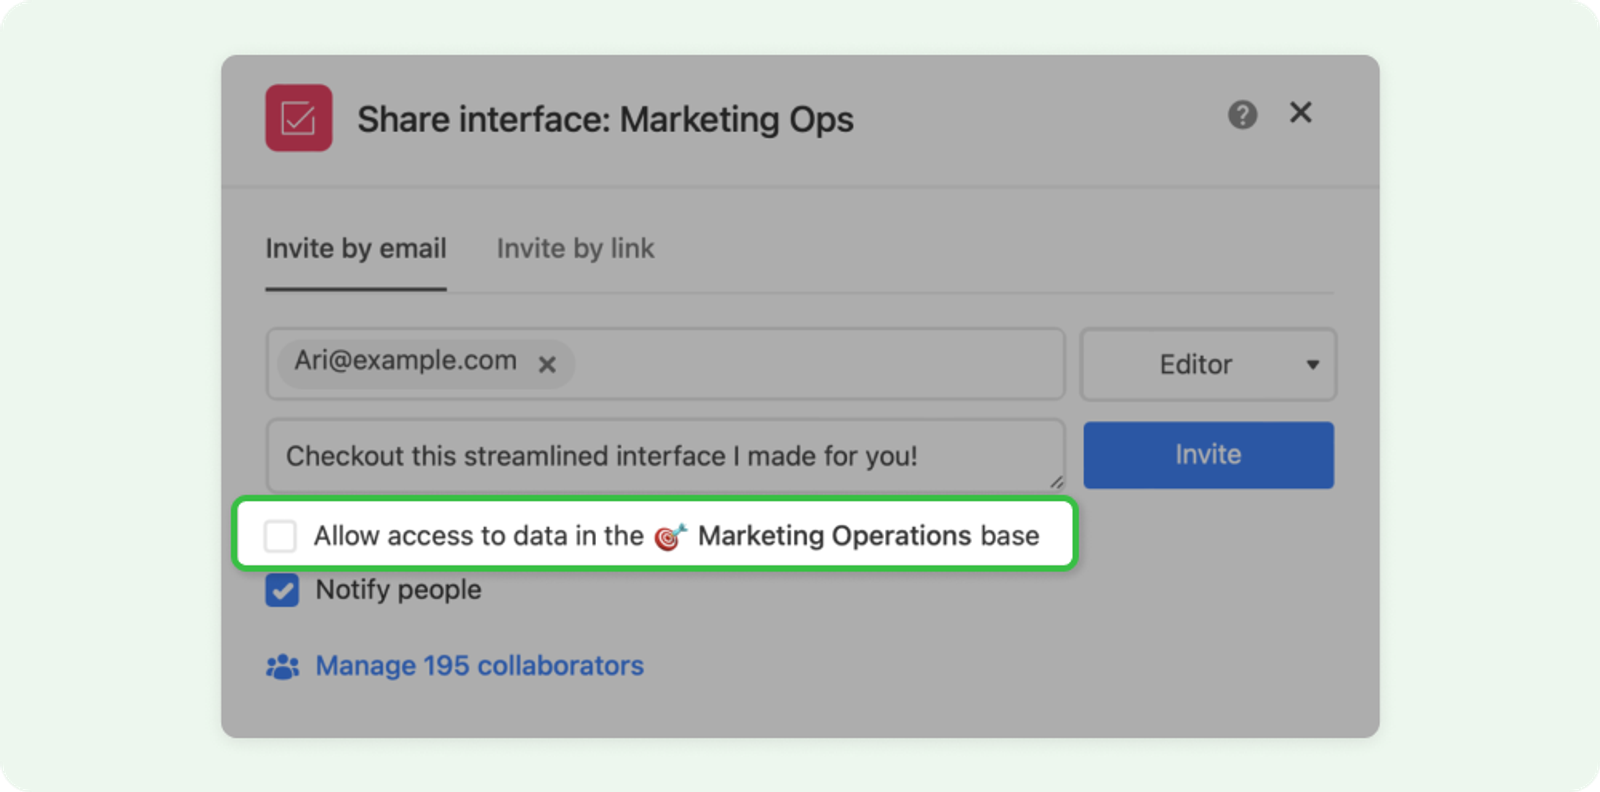
If your collaborators do not need (or even should not have) access to the underlying base, you’ll want to make sure the “Allow access to the data in the [base name] base” box is not checked in the Share window. This option is only available for customers on Airtable’s Team, Business, or Enterprise Scale plans, and by default starts un-checked when the Share interface window is opened.
But let’s say you do have a collaborator who has a unique workflow that your interface doesn’t support yet—or maybe their responsibilities require direct access to your underlying base (example: they need access to automations). In this last scenario, you won’t want to transition that collaborator or their workflow to your interface. Their existing base permissions will given them the ability to see the interface though so even if you don’t include them as part of your transition group, making sure they are aware of what you’ve built and whom it is intended for is highly recommended.
Step 5: Formally transition away from personalized views
Once you’ve worked through steps 1-4 of this guide, you should feel confident that the personalized interfaces you’ve created meet the needs of your collaborators in question. Now it’s time to sync with your collaborators and explain the need to transition.
For best results, set up some time to demonstrate how your new approach, using a personalized interface, can streamline their work in Airtable. This is also a great opportunity to learn more about their exact process and potentially iterate quickly inside of Interface Designer to create an even better experience for them.
Once they’re on board, agree on a date when they’ll officially stop using the personal views. Take the following considerations in mind:
- Pick a date and time that doesn’t coincide with a particularly critical part of your company’s operations
- Send reminder communications well in advance of the transition date
- Make sure other base and workflow stakeholders are also aware of the upcoming transition date
On the day of the transition itself, don’t immediately delete the personal views. Instead, start by renaming them to include a word like “deprecated” or “decommissioned” as a way to signal that they are no longer supposed to be used. You could also move the views into a new view section and give it a similar type of name to further indicate they are no longer “in service.”
Let your collaborators know that you’re going to start the transition process by first removing their access to the base in question, and then immediately inviting them back as interface-only collaborators using the permission level decisions you arrived at in step 4. Once they’re re-invited, be sure to confirm that they have the interface access they expected.
Pro tip
Depending on how many collaborators you are transitioning, you may not need to do them all at the same time or on the same day. Within a timeframe that works for you, stagger the transition dates and times so you can address issues individually if they come up.
After you and your transitioned collaborators are comfortable that everything is working, take the following steps to delete the now obsolete personalized views:
- Ensure the views are no longer being used in any active syncs
- Triple check to make sure none of the views are embedded anywhere
- Confirm that none of the automations in the base rely on any of these views to work
- Take a base snapshot to make sure you can rollback changes if needed
- Delete the personalized views
- Set a reminder to check-in with the collaborators a week or two after the transition, to make sure things are still going smoothly
Pro tip for Team, Business, and Enterprise Scale plan customers
Use field manager to quickly identify various view dependencies.
For Airtable Business and Enterprise Scale plan customers, keep monitoring post transition interface usage with the insights panel in order to ensure your collaborators continue to be successful.
Moving from multiple bases to interfaces with permissions
For data security reasons, you might have built a setup that supports different individual or group workflows with fully separated downstream destination bases, which sync from an upstream source base. If you decide to transition the workflows of these destination bases back to the source base, know that these types of migrations are more involved than simply transitioning views, and shouldn’t be undertaken lightly. Because you are removing entire apps from the equation by sunsetting the destination bases, you have to ensure that additional data and logic layer functionality isn’t also accidentally impacted.
Below are a list of important things to consider before you make any attempts to migrate from a multi-base setup into using interfaces with granular permissions:
- What is the underlying purpose for having multiple bases set up this way? Is it purely to ensure that only subsets of data (or even subsets of a field) are shared with specific audiences? Or do those separate bases also include things like automations, or other functionality that is critical to the success of the workflow?
- What are the relationships between the bases? Is it a straightforward source base that syncs data downstream to destination bases? Or are there other syncs from other bases, or potentially even between the destination bases themselves?
- Does consolidating all of the downstream destination bases into the source base impact your Airtable plan limits (records, attachment storage, automations, sync integrations)?
After you’ve worked through these questions and are confident about transitioning destination bases to interfaces using granular permissions, don’t jump directly to building new views and interfaces in the source base. Instead, take time to think through the proper design of your interfaces as it maps to whom you are building for and what they need to accomplish.
Don’t be afraid to involve the users of these destination bases in this design phase. This not only helps ensure you’ve captured the necessary workflow requirements, but it also helps involve users in the transition planning. You’ll need to decide whether you’ll need to migrate data from destination bases back into a source base. Take a similar approach to that outlined in steps 3 and 4, paying close attention to adding the necessary user filtering and permissions to guarantee the right level of data security.
Use the transition strategy outlined in step 5 (when you transitioned views to interfaces) when building the transition plan for your bases:
- Pick a date and time that doesn’t coincide with a particularly critical part of your company’s operations
- Send reminder communications well in advance of the transition date
- Make sure other base and workflow stakeholders are also aware of the upcoming transition date
- Stagger the actual transitions themselves to minimize risks
- Don’t immediately delete the destination bases or stop the syncs for the source base
Create check-ins with the collaborators a week or two after the transition, to make sure the new interfaces are supporting your collaborator’s workflows successfully.

