`, we render the primary cell value of the record. Instead of using
`record.primaryCellValue`, we use `record.name` to automatically handle
converting cell values to string (for example, the table's primary field might be a number field).
`record.name` might be an empty string, in which case we want to show "Unnamed
record" in our list.
You should now see the primary cell value of the records in the table in your extension, and if you edit
any of the names from outside the extension, the extension will automatically update to show the latest
names.
If you want to get the cell values from other fields, you can use `record.getCellValue()` or
`record.getCellValueAsString()`.
### Expanding records
Let's add a button to allow users to expand the record and edit its contents.
Before we do that, let's refactor our extension a little bit. It'll make it easier to add functionality
and keep our code more readable if we create a separate `Task` component, instead of continuing to
add code to the top-level `TodoExtension` component:
```diff
import {
initializeBlock,
useBase,
useRecords,
} from '@airtable/blocks/ui';
import React from 'react';
function TodoExtension() {
const base = useBase();
const table = base.getTableByName('Tasks');
const records = useRecords(table);
const tasks = records.map(record => {
- return (
-
);
```
Our new Task component takes a prop called `record` and renders its name, or "Unnamed record" if its
name is blank.
Now we can change our `Task` component to expand the record when the user
clicks on a nearby button. We'll do that by using the `TextButton` component
and giving it an `onClick` handler that calls `expandRecord()`. To keep this button minimal, we'll label it with an icon instead of text.
```diff
import {
initializeBlock,
useBase,
useRecords,
+ expandRecord,
+ TextButton,
} from '@airtable/blocks/ui';
import React from 'react';
function TodoExtension() { /* No changes */ }
function Task({record}) {
return (
);
```
Clicking on the expand button in your extension will expand the record, allowing
you to edit its name and other fields. You can also use the `Tab` key
on your keyboard to focus on one of the buttons and then press `Enter` to expand the record.
### A little style
One last thing to do before we wrap up Part 1: let's add some CSS styles to make our extension look
polished! Feel free to tweak the below styles to customize your extension.
```diff
function Task({record}) {
return (
-
+
{record.name || 'Unnamed record'}
{
expandRecord(record);
}}
/>
);
}
```
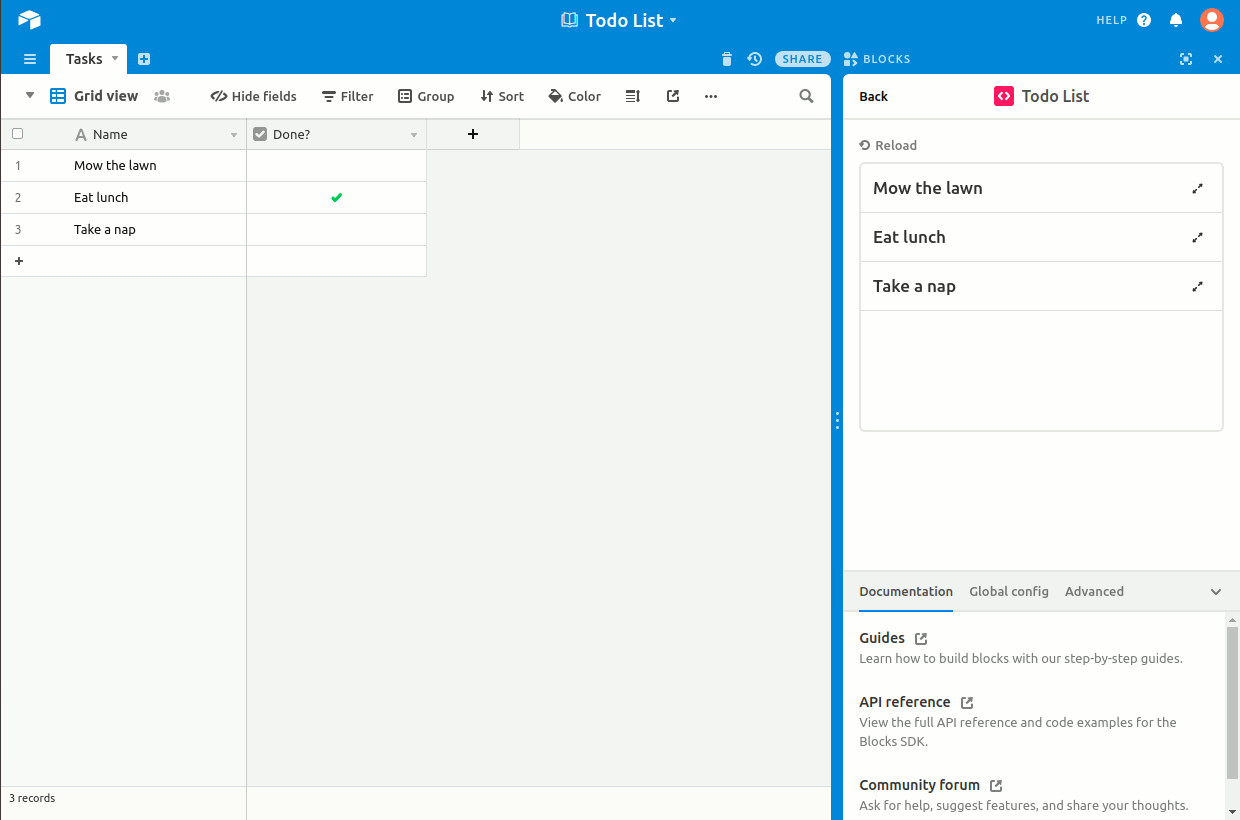
Congratulations on finishing Part 1! You should have an extension that looks like this:
## Part 2
The extension we made in Part 1 has a pretty big limitation: it only works if the base has a table
called "Tasks." Try renaming the table and you'll see the extension crash.
Let's change the extension to let the user pick which table they want to use to show their tasks!
### Don't crash when there's no table
First, we need to change `TodoExtension` to handle the case where there is no table selected. Instead of
crashing, we'll change it to show a blank screen:
```diff
function TodoExtension() {
const base = useBase();
- const table = base.getTableByName('Tasks');
+ const table = base.getTableByNameIfExists('Tasks');
const records = useRecords(table);
- const tasks = records.map(record => {
- return
;
- });
+ const tasks = records ? records.map(record => {
+ return
;
+ }) : null;
return (
{tasks}
);
}
```
`base.getTableByName` will crash the extension if there's no table in the base with the specified name.
`base.getTableByNameIfExists` will return null instead of crashing if there's no table with the
specified name.
Now that `table` might be null, we need to be careful when using it. It's okay to call `useRecords` with `null`,
but the returned `records` will also be null. We use a ternary expression to make sure we're only calling
`records.map` when `records` is not null. If `records` is null, we won't try rendering any `Task` components.
```js
const tasks = records ? records.map(record => (
)) : null;
```
_Aside:_ the above line is equivalent to:
```js
let tasks;
if (records) {
tasks = records.map(record => {
return
;
});
} else {
tasks = null;
}
```
We prefer to use ternary expressions for these null checks because they help make the code more
concise, but you can write out `if` statements if you prefer!
Now the extension should work as before, but if you rename the "Tasks" table, the extension should show a
blanks screen instead of crashing. Change the name of the table back to "Tasks" and the records
should appear again inside the extension.
### Storing the selected table in state
Right now we're hard-coding "Tasks" as the table name the extension will use. To let the user specify
which table they want to use, we'll store the table name in the `TodoExtension` component's state with
[React's built-in useState hook:](https://reactjs.org/docs/hooks-state.html)
```diff
import {
initializeBlock,
useBase,
useRecords,
expandRecord,
TextButton,
} from '@airtable/blocks/ui';
-import React from 'react';
+import React, {useState} from 'react';
function TodoExtension() {
const base = useBase();
+ const [tableName, setTableName] = useState('Tasks');
- const table = base.getTableByNameIfExists('Tasks');
+ const table = base.getTableByNameIfExists(tableName);
const records = useRecords(table);
const tasks = records ? records.map(record => (
)) : null;
return (
{tasks}
);
}
function Task({record}) { /* No change */ }
initializeBlock(() =>
);
```
We're still hard-coding "Tasks" as the initial table name, but if we call `setTableName` with the
name of another table, the extension will switch to show records from that table. To make sure make sure
that works, we need to add some way for the user to pick a table. The Blocks SDK includes a
`TablePicker` component we can use!
```diff
import {
initializeBlock,
useBase,
useRecords,
expandRecord,
+ TablePicker,
TextButton,
} from '@airtable/blocks/ui';
import React, {useState} from 'react';
function TodoExtension() {
const base = useBase();
const [tableName, setTableName] = useState('Tasks');
const table = base.getTableByNameIfExists(tableName);
const records = useRecords(table);
const tasks = records ? records.map(record => (
)) : null;
return (
+
{
+ setTableName(newTable.name);
+ }}
+ />
{tasks}
);
}
function Task({record}) { /* No change */ }
initializeBlock(() =>
);
```
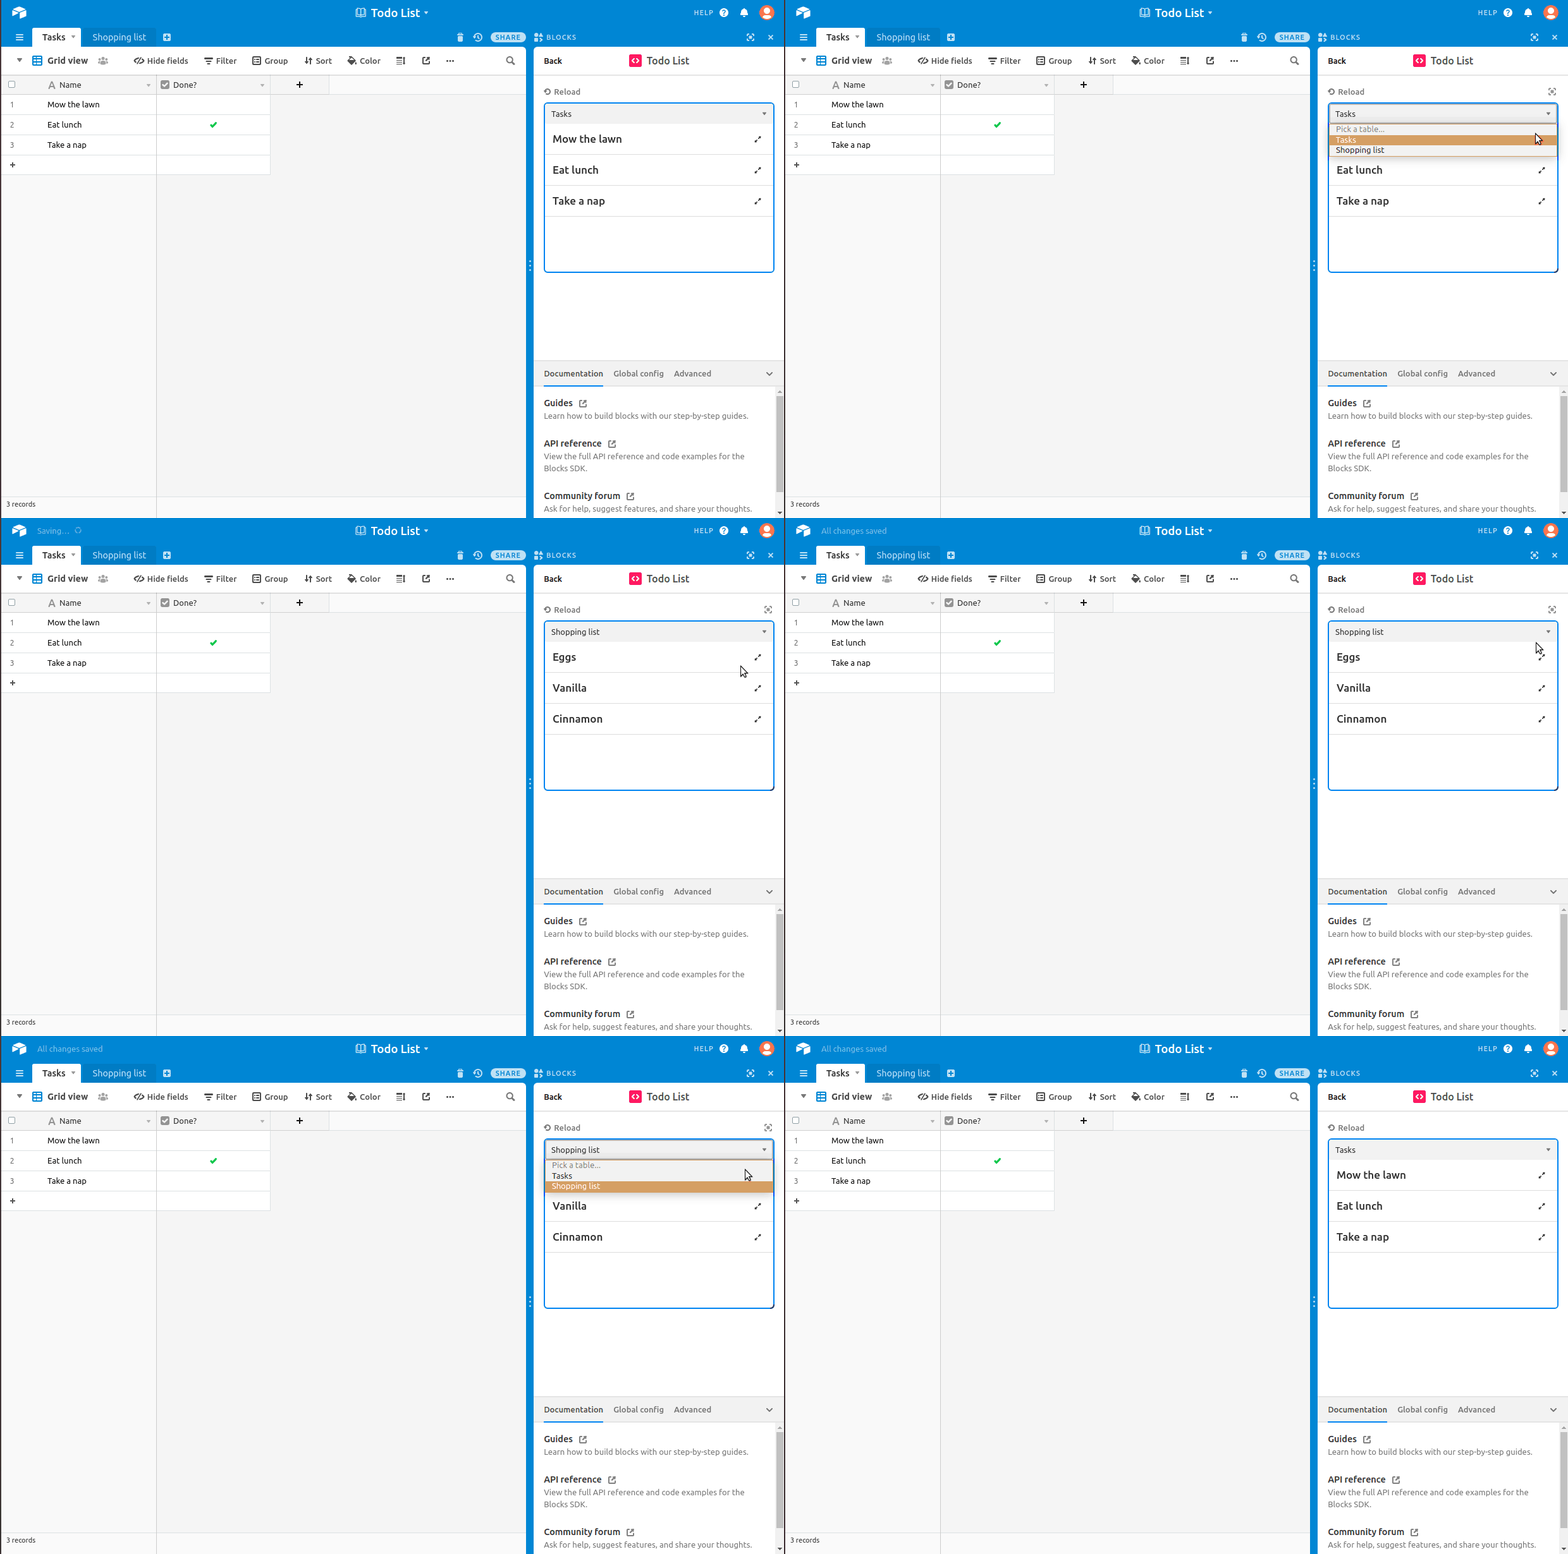
Now there should be a dropdown that lets you pick between different tables in the base (create a new
table if you only have 1)!
### Using table ID instead of table name
It's definitely an improvement that the user can pick which table to use. But if anyone renames the
table, the extension will stop showing the records until you pick the table again. We can avoid this by
using the table's ID instead of its name. The table ID won't change when the table gets renamed.
```diff
function TodoExtension() {
const base = useBase();
- const [tableName, setTableName] = useState('Tasks');
+ const [tableId, setTableId] = useState(null);
- const table = base.getTableByNameIfExists(tableName);
+ const table = base.getTableByIdIfExists(tableId);
const records = useRecords(table);
const tasks = records ? records.map(record => (
)) : null;
return (
{
- setTableName(newTable.name);
+ setTableId(newTable.id);
}}
/>
{tasks}
);
}
```
Now try renaming the selected table. The extension will continue to show records from that table!
## Part 3
The user can pick which table they want to show tasks from, but the extension doesn't remember their
choice. Every time they load the extension, they start with an empty list until they pick the table. It
would be better if the extension remembered the user's choice!
### Storing configuration
Each extension installation has a storage mechanism called `globalConfig` where you can store
configuration information. The contents of `globalConfig` will be synced in real-time to all logged
in users of that extension installation. Because any base collaborator can read from it, you shouldn't
store sensitive data here.
Airtable's existing extensions, like _Page designer_ and _Chart_, make heavy use of global config, and
your extensions will likely do the same. For example, Airtable's Chart extension lets you choose which kind
of chart you want to use (bar chart, pie chart, etc) and it stores the chart type in `globalConfig`.
Let's change the extension to store the selected table's ID in `globalConfig` instead of the `TodoExtension`
component's state:
```diff
import {
initializeBlock,
useBase,
useRecords,
+ useGlobalConfig,
expandRecord,
TablePicker,
TextButton,
} from '@airtable/blocks/ui';
import React from 'react';
function TodoExtension() {
const base = useBase();
- const [tableId, setTableId] = useState(null);
+ const globalConfig = useGlobalConfig();
+ const tableId = globalConfig.get('selectedTableId');
const table = base.getTableByIdIfExists(tableId);
const records = useRecords(table);
const tasks = records ? records.map(record => (
)) : null;
return (
{
- setTableId(newTable.id);
+ globalConfig.setAsync('selectedTableId', newTable.id);
}}
/>
{tasks}
);
}
function Task({record}) { /* No changes */ }
initializeBlock(() =>
);
```
Let's walk through the lines that changed:
```js
const globalConfig = useGlobalConfig();
```
With the `useGlobalConfig` hook, we can have our `TodoExtension` component access data in `globalConfig`
and automatically re-render when any of that data changes.
```js
const tableId = globalConfig.get('selectedTableId');
```
Previously, the table ID was stored in the component state with the `useState` hook. Now we're
storing it in `globalConfig`, so we get its value by calling `globalConfig.get()`. We're choosing to
use "selectedTableId" as the key in globalConfig, but you could call it whatever you want—it just
has to match the key you pass to `globalConfig.setAsync()` below.
```js
globalConfig.setAsync('selectedTableId', newTable.id);
```
When the user picks a new table from the `TablePicker`, we use `globalConfig.setAsync()` to update
the table ID that's stored in `globalConfig`.
Values in `globalConfig` can be strings, numbers, booleans, null, arrays, and plain objects—anything
that can be encoded as JSON. This means we can't store the table object directly in `globalConfig`,
so we store its ID instead, which is a string.
Now when you pick the table, it'll be saved. If you reload the extension installation, it'll remember
the table you were using. Much better!
### Permissions
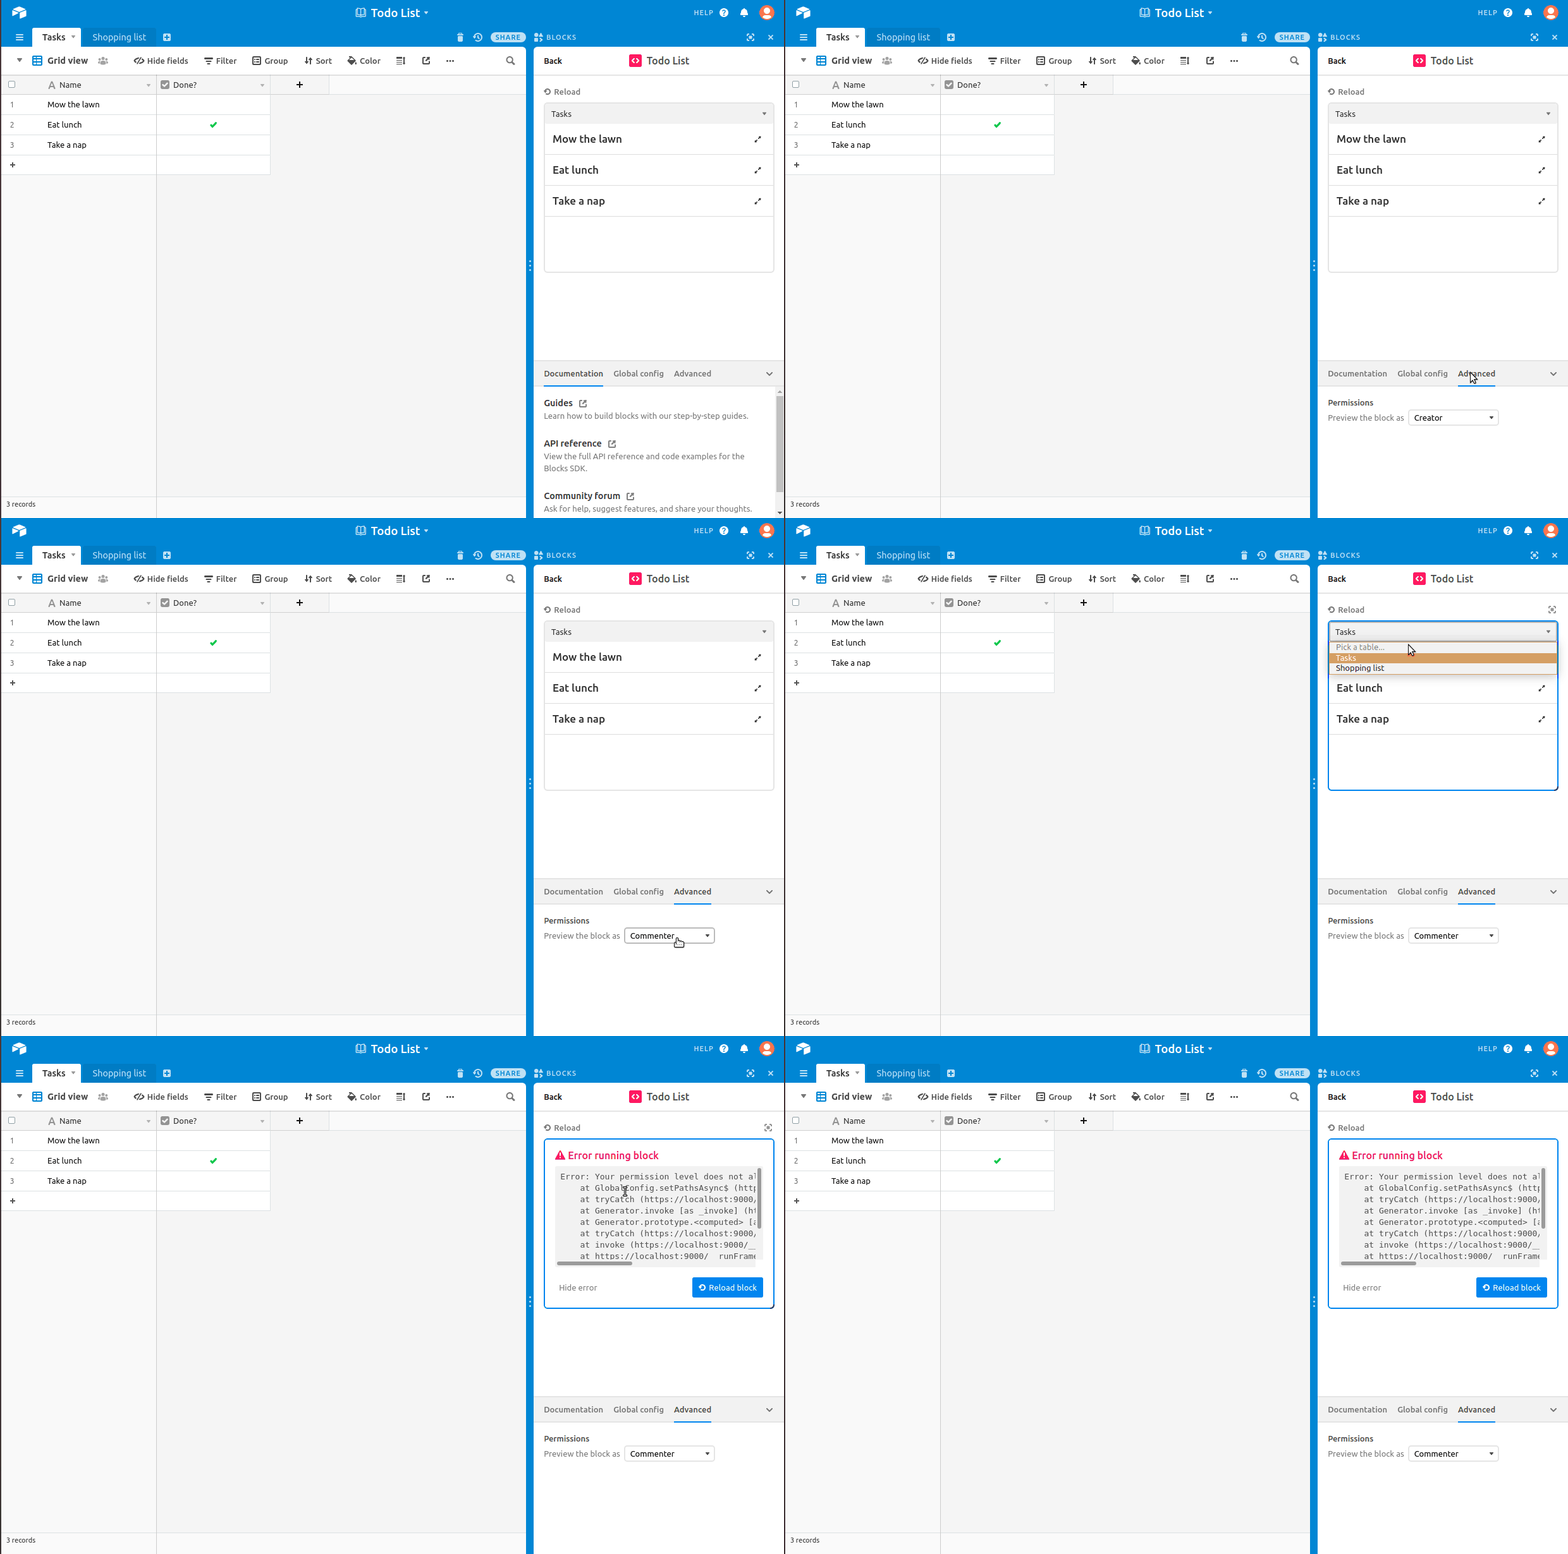
There's a bug in the changes we just made. Read-only and comment-only collaborators aren't allowed
to update globalConfig, so if they try changing the selected table our extension will crash. You can try
this out by clicking "Simulate," then choosing "Read" or "Comment" from the dropdown:
We could fix this by disabling the `TablePicker` if the user doesn't have permission to change
`globalConfig` by using `globalConfig.checkPermissionsForSetPaths()`.
But there's an easier way! The `TablePicker` component has a sibling component called
`TablePickerSynced` which automatically reads and writes to `globalConfig` with the proper
permission checks. Let's switch to that.
```diff
import {
initializeBlock,
useBase,
useRecords,
useGlobalConfig,
expandRecord,
- TablePicker,
+ TablePickerSynced,
TextButton,
} from '@airtable/blocks/ui';
import {globalConfig} from '@airtable/blocks';
import React, {useState} from 'react';
function TodoExtension() {
const base = useBase();
const globalConfig = useGlobalConfig();
const tableId = globalConfig.get('selectedTableId');
const table = base.getTableByIdIfExists(tableId);
const records = useRecords(table);
const tasks = records ? records.map(record => (
)) : null;
return (
-
{
- globalConfig.setAsync('selectedTableId', newTable.id);
- }}
- />
+
{tasks}
);
}
function Task({record}) { /* No change */ }
initializeBlock(() =>
);
```
Instead of passing a `table` and an `onChange` prop, we tell `TablePickerSynced` which key in
`globalConfig` it should read from and write to using the `globalConfigKey` prop.
Now if you try simulating a "Read" or "Comment" permission level, the table picker will become
disabled.
## Part 4
As the user accomplishes their tasks, they'll want some way to note their
achievement and keep track of what they still have left to do. This is a "to
do" application, after all! Let's extend the list so that users can see and
update which tasks are complete.
### Tracking completed tasks
Each record in the base has a single line text field that describes a task. It
should also have a checkbox field that denotes when a task is complete. If your
table doesn't have a checkbox field yet, you should add one now so that we can
visualize this task status in the extension.
Our extension needs to know which field in the table is the checkbox field. Rather
than assuming that we know the exact name or ID of this field, we'll apply the
same pattern we used to make the table name configurable. This time, we'll use
the `FieldPickerSynced` component to store the field ID in `globalConfig`. The
`Task` component will need this field ID, so we'll supply it as a prop, but
we'll wait to update the component until the next step.
We'll also add an extra check to verify that the field still exists. If someone
deletes the field, we don't want the task trying to lookup a cell value for a
non-existent field!
```diff
import {
+ FieldPickerSynced,
initializeBlock,
useBase,
useRecords,
useGlobalConfig,
expandRecord,
TablePickerSynced,
TextButton,
} from '@airtable/blocks/ui';
import {globalConfig} from '@airtable/blocks';
import React, {useState} from 'react';
function TodoExtension() {
const base = useBase();
const globalConfig = useGlobalConfig();
const tableId = globalConfig.get('selectedTableId');
+ const completedFieldId = globalConfig.get('completedFieldId');
const table = base.getTableByIdIfExists(tableId);
+ const completedField = table ? table.getFieldByIdIfExists(completedFieldId) : null;
const records = useRecords(table);
- const tasks = records ? records.map(record => (
+ const tasks = records && completedField ? records.map(record => (
-
+
)) : null;
return (
);
}
function Task({record}) { /* No change */ }
initializeBlock(() =>
);
```
Now, the user is able to tell us which field describes whether a task is
complete or not. That's nice, but we'll need to update the `Task` component
before they can see the field's effect.
```diff
-function Task({record}) {
+function Task({record, completedFieldId}) {
+ const label = record.name || 'Unnamed record';
+
return (
- {record.name || 'Unnamed record'}
+ {record.getCellValue(completedFieldId) ? {label} : label}
{
expandRecord(record);
}}
/>
);
}
```
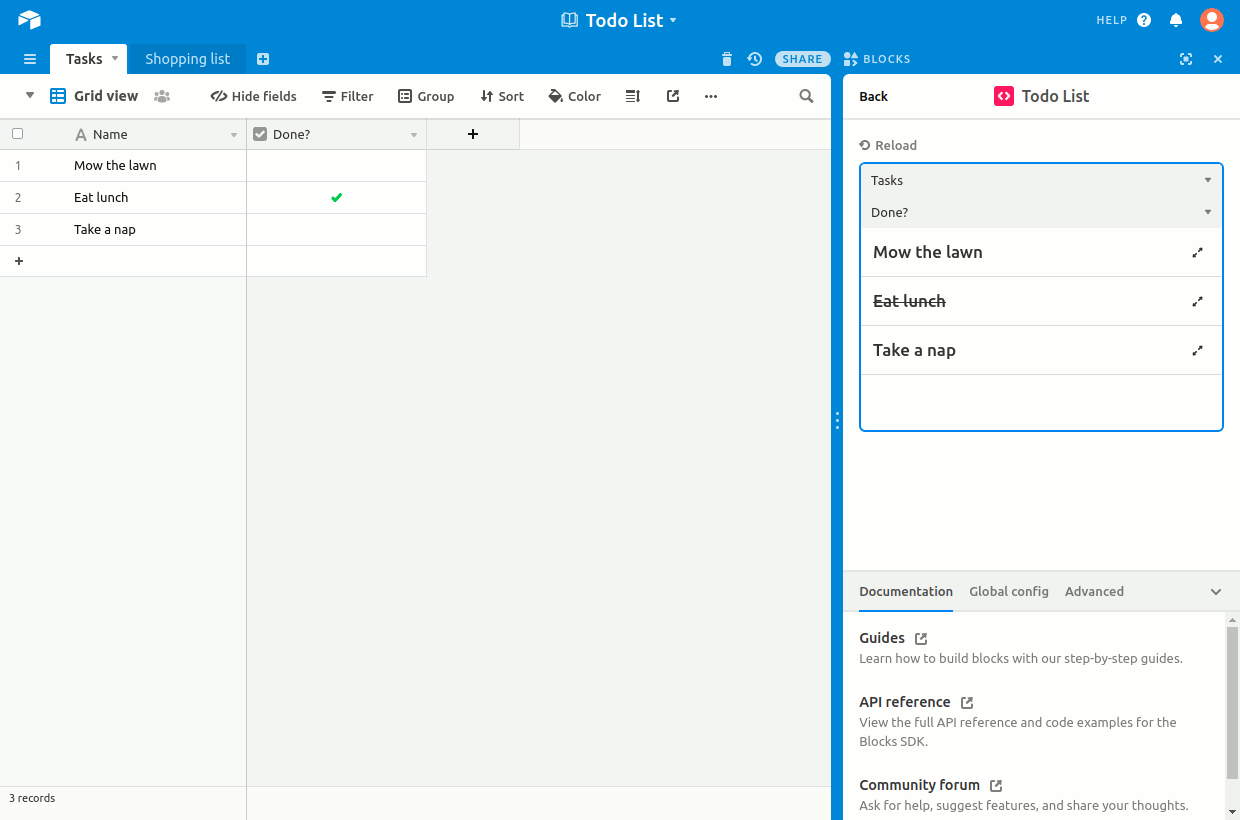
If the task is complete, we'll wrap its name in an `
` (strikethrough)
element, so that browsers and screen readers know that it is no longer
relevant. Otherwise, we can render the task name as a normal string. Here's
a screen shot of what the extension should look like now:
Perfect!
### Making it interactive
If we modify the checkbox values in the table, we can watch the tasks in our
extension update in real time. Before we can call this extension "complete", though, we should allow the user to toggle that state from the task list itself.
We need to use the table method `updateRecordAsync` to modify the record. While
we could give each `Task` component a reference to the whole table, this will
make it harder for others to predict the extent of the `Task` component's
behavior. Instead, we'll make a function that can toggle whether a task is
complete or not and pass that function to the `Task` component.
```diff
import {
FieldPickerSynced,
initializeBlock,
useBase,
useRecords,
useGlobalConfig,
expandRecord,
TablePickerSynced,
TextButton,
} from '@airtable/blocks/ui';
import {globalConfig} from '@airtable/blocks';
import React, {useState} from 'react';
function TodoExtension() {
const base = useBase();
const globalConfig = useGlobalConfig();
const tableId = globalConfig.get('selectedTableId');
const completedFieldId = globalConfig.get('completedFieldId');
const table = base.getTableByIdIfExists(tableId);
const completedField = table ? table.getFieldByIdIfExists(completedFieldId) : null;
+ const toggle = (record) => {
+ table.updateRecordAsync(
+ record, {[completedFieldId]: !record.getCellValue(completedFieldId)}
+ );
+ };
+
const records = useRecords(table);
const tasks = records && completedField ? records.map(record => (
-
+
)) : null;
return (
);
}
function Task({record, completedFieldId}) { /* No change */ }
initializeBlock(() => );
```
Now, we can update the `Task` component to detect when the user interacts with
the task (e.g. by clicking on it or pressing the `Enter` key) and
invoking the new function.
```diff
-function Task({record, completedFieldId}) {
+function Task({record, completedFieldId, onToggle}) {
const label = record.name || 'Unnamed record';
return (
+ {
+ onToggle(record);
+ }}
+ >
{record.getCellValue(completedFieldId) ? {label} : label}
+
{
expandRecord(record);
}}
/>
);
}
```
With that change in place, users can modify the records in the table, tracking
their progress as they accomplish each task. For more details about modifying
data in a base, check out [Write back to
Airtable](https://airtable.com/developers/extensions/guides/write-back-to-airtable.md).
## The end!
We covered a lot of ground, kudos for making it to the end!
Here's a quick recap of the parts of the SDK we used. You can click the links to read more in-depth
documentation about each one:
- Part 1
- [useBase](https://airtable.com/developers/extensions/api/ui/hooks/usebase.md) hook to get the
[base](https://airtable.com/developers/extensions/api/models/base.md) object and subscribe
to schema changes.
- [base.getTableByName()](https://airtable.com/developers/extensions/api/models/base.md#getTableByName) to get a [table](https://airtable.com/developers/extensions/api/models/table.md) object.
- [table.selectRecords()](https://airtable.com/developers/extensions/api/models/table.md#selectRecords),
[useRecords](https://airtable.com/developers/extensions/api/ui/hooks/userecords.md) hook, and
[record.name](https://airtable.com/developers/extensions/api/models/record.md#name) to read the records in a table.
- [expandRecord()](https://airtable.com/developers/extensions/api/ui/utils/expandrecord.md) to expand records in Airtable.
- [TextButton](https://airtable.com/developers/extensions/api/ui/components/textbutton.md) to display a recognizable target for the user to click
- Part 2
- [base.getTableByNameIfExists()](https://airtable.com/developers/extensions/api/models/base.md#getTableByNameIfExists) and [base.getTableByIdIfExists()](https://airtable.com/developers/extensions/api/models/base.md#getTableByIdIfExists)
- [TablePicker](https://airtable.com/developers/extensions/api/ui/components/tablepicker.md)
component.
- Part 3
- [globalConfig](https://airtable.com/developers/extensions/api/models/globalconfig.md) to store
extension configuration.
- [useGlobalConfig](https://airtable.com/developers/extensions/api/ui/hooks/useglobalconfig.md)
hook to watch changes to globalConfig.
- [TablePickerSynced](https://airtable.com/developers/extensions/api/ui/components/tablepicker/synced.md)
component.
- Part 4
- [FieldPickerSynced](https://airtable.com/developers/extensions/api/ui/components/fieldpickersynced.md) component.
- [table.updateRecordAsync()](https://airtable.com/developers/extensions/api/models/table.md#updateRecordsAsync) to
modify cells of a given [record](https://airtable.com/developers/extensions/api/models/record.md)
## Extra credit
### Only showing records from a view
Right now, our extension shows all the records in our Tasks table. It might be more useful to have it
only show records from a specific
[view](https://support.airtable.com/docs/getting-started-with-airtable-views#what-is-a-view). Then
we can filter the view to control which records we see in the extension. For example, we could create a
filter to only show tasks that aren't done yet.
It's easy to switch from showing records in a table to showing records in a view:
```diff
import {
FieldPickerSynced,
initializeBlock,
useBase,
useRecords,
useGlobalConfig,
expandRecord,
TablePickerSynced,
TextButton,
+ ViewPickerSynced,
} from '@airtable/blocks/ui';
import {globalConfig, models} from '@airtable/blocks';
import React, {useState} from 'react';
function getCheckboxField(table, fieldId) { /* No changes */}
function TodoExtension() {
const base = useBase();
const globalConfig = useGlobalConfig();
const tableId = globalConfig.get('selectedTableId');
+ const viewId = globalConfig.get('selectedViewId');
const completedFieldId = globalConfig.get('completedFieldId');
const table = base.getTableByIdIfExists(tableId);
+ const view = table ? table.getViewByIdIfExists(viewId) : null;
const completedField = table ? table.getFieldByIdIfExists(completedFieldId) : null;
- const records = useRecords(table);
+ const records = useRecords(view);
const tasks = records && completedField ? records.map(record => (
)) : null;
return (
);
}
function Task({record, doneField}) { /* No changes */ }
initializeBlock(() => );
```
Just like how we get the `Table` object by using `base.getTableByIdIfExists`, we get the `View`
object by using `table.getViewByIdIfExists`.
You can also pass `View` to `useRecords` - the `records` returned will only contain the records
that are visible in that view.
That's it! Try adding filters to the selected view. The records in the extension will automatically get
filtered out.